Hello Everyone!
I just recently updated my
Artfire Studio with new pretty fancy schmancy studio sections and updated menu images and links for social networking, etc.
And since I know html can still give some people issues I want to give you a very basic breakdown of the code that I used and the steps to get your studio customized!
Step 1: Create your images. You can make yours whatever size you want obviously, but these are the sizes I used for mine and you can check out the link above to see my studio.


150x60 pixels
150x32 pixels
I made these in photoshop and if you'd like some help with that please let me know and I can try to help but Im not super familiar with many other photo editing software and may only be able to give general tips if needed.
Step 2: Once you have all of your images created for all of your sections, subsections, social networking sites, email and whatever else you want, you will need to upload them to a photo hosting site unless you have your own. I use
Photobucket, but there is also
ImageShack and
Flickr among some of the free ones available.
Step 3: Open notepad/texpad or any text document program you're comfortable with. I use notepad. Now you will want to go to your studio and copy down each of your studio section links. I normally just click the link and then click on the url web address bar at the top of my browser and copy and then paste it into my notepad document, You will want to label them obviously so it won't get so confusing looking at so many url's.
Here is what mine looks like: click on image for a bigger picture
Obviously, you can have more or less depending on how you have your studio setup. You can also do a search through your own studio if you wanted to be even more thorough with your sections and copy those links and make images for those particular searches, eg: by color, etc.
Step 4: Now that you have all of your images and all of your urls ready to go, it's time to code!
I just wrote mine underneath all of the urls I pasted into my notepad to keep everything simple and in one place and that way it's all saved in one spot too in case you need to make any changes. You will also want to keep your photo hosting site open to get the image urls easily too.
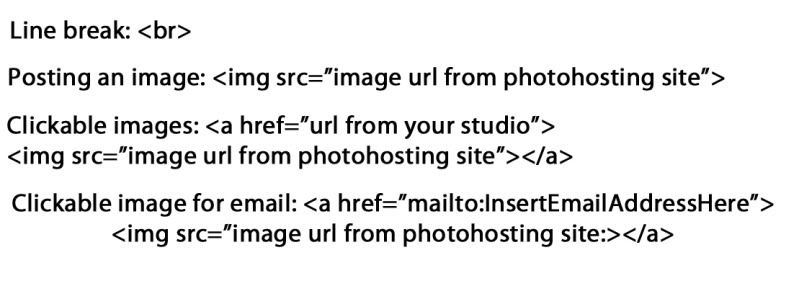
Here are the basic html codes I used for mine. click on image for a bigger picture
Mine pretty much just uses the clickable image code a lot.
If you want to reference mine: here's my layout.
Img Src for the main studio section image
line break
line break
Clickable links for each of the studio sections
line break between each section and two line breaks between each main section
Img src for the image for my social networking section (find me online)
line break
Clickable link for each site (blog, facebook, twitter and whatever else you want to put)
line break
line break
Clickable image for email
I sure hope that all made sense!
Step 5: Once you have all your code typed out, be sure you save your notepad work. You will now want to create a widget for your studio sections. Make sure all of your code is in the order you want it to appear in your studio. You can find widgets via "My Artfire Dashboard" > "My studio" > "My widgets" > "Add a new studio widget" > "Text/Html/Flash"
Once you click on the link that says "Text/Html/Flash" it will open up a little box for you to paste all of your code (only the code part and not any of the urls you pasted when you were gathering your links together at the very beginning!). Be sure to click "add widget". You can now check your studio to make sure that it looks the way it's supposed to, when you are happy with it you will then want to disable the Artfire generated studio sections by following the next step!
Step 6: You will go to your Atfire studio and disable your layout sections which can be found via "My Artfire Dashboard" > "My studio" > "Layout/Sections" > "My studio Sections" And make sure you click on disable and save.
And if I did my instructions well - you now have a customized Artfire Studio! Hooray!
Please note: As far as I can tell the artfire generated payment processors image cannot be moved. Sorry.
Please let me know if there needs to be any clarification to any of these instructions and I can try to clear it up and post an edit.
Thanks!